

Table Of Contents
Hey everyone, I’m back with another irresistible recipe! This time, we’re diving into the world of delicious, homemade ciabatta bread, and trust me, it’s easier than you think!
I recently stumbled upon an incredible no-knead ciabatta recipe online, and after making it a few times, I knew I had to share it with you. It’s perfect for beginners, requires minimal effort, and delivers bakery-worthy results every single time. ✨
Raise your hand if you love the feeling of warm, fresh bread straight out of the oven? ♀️♂️ Me too! There’s something magical about that aroma filling the house and seeing the joy on family members’ faces as they devour it.
This recipe makes delicious ciabatta bread without any kneading! It’s easier than other Italian breads like focaccia, but might take a few tries to master.
Don’t worry if it’s not perfect at first, you’ll get there! This recipe uses simple steps and helpful tips to guide you. You’ll also get ideas for yummy Italian sandwiches and other ways to enjoy your homemade ciabatta.
I’m excited to share this recipe with you and answer any questions you might have along the way. So grab your mixing bowl, preheat your oven, and get ready to experience the easiest and most delicious ciabatta you’ll ever make!
What makes a good, authentic loaf of ciabatta?
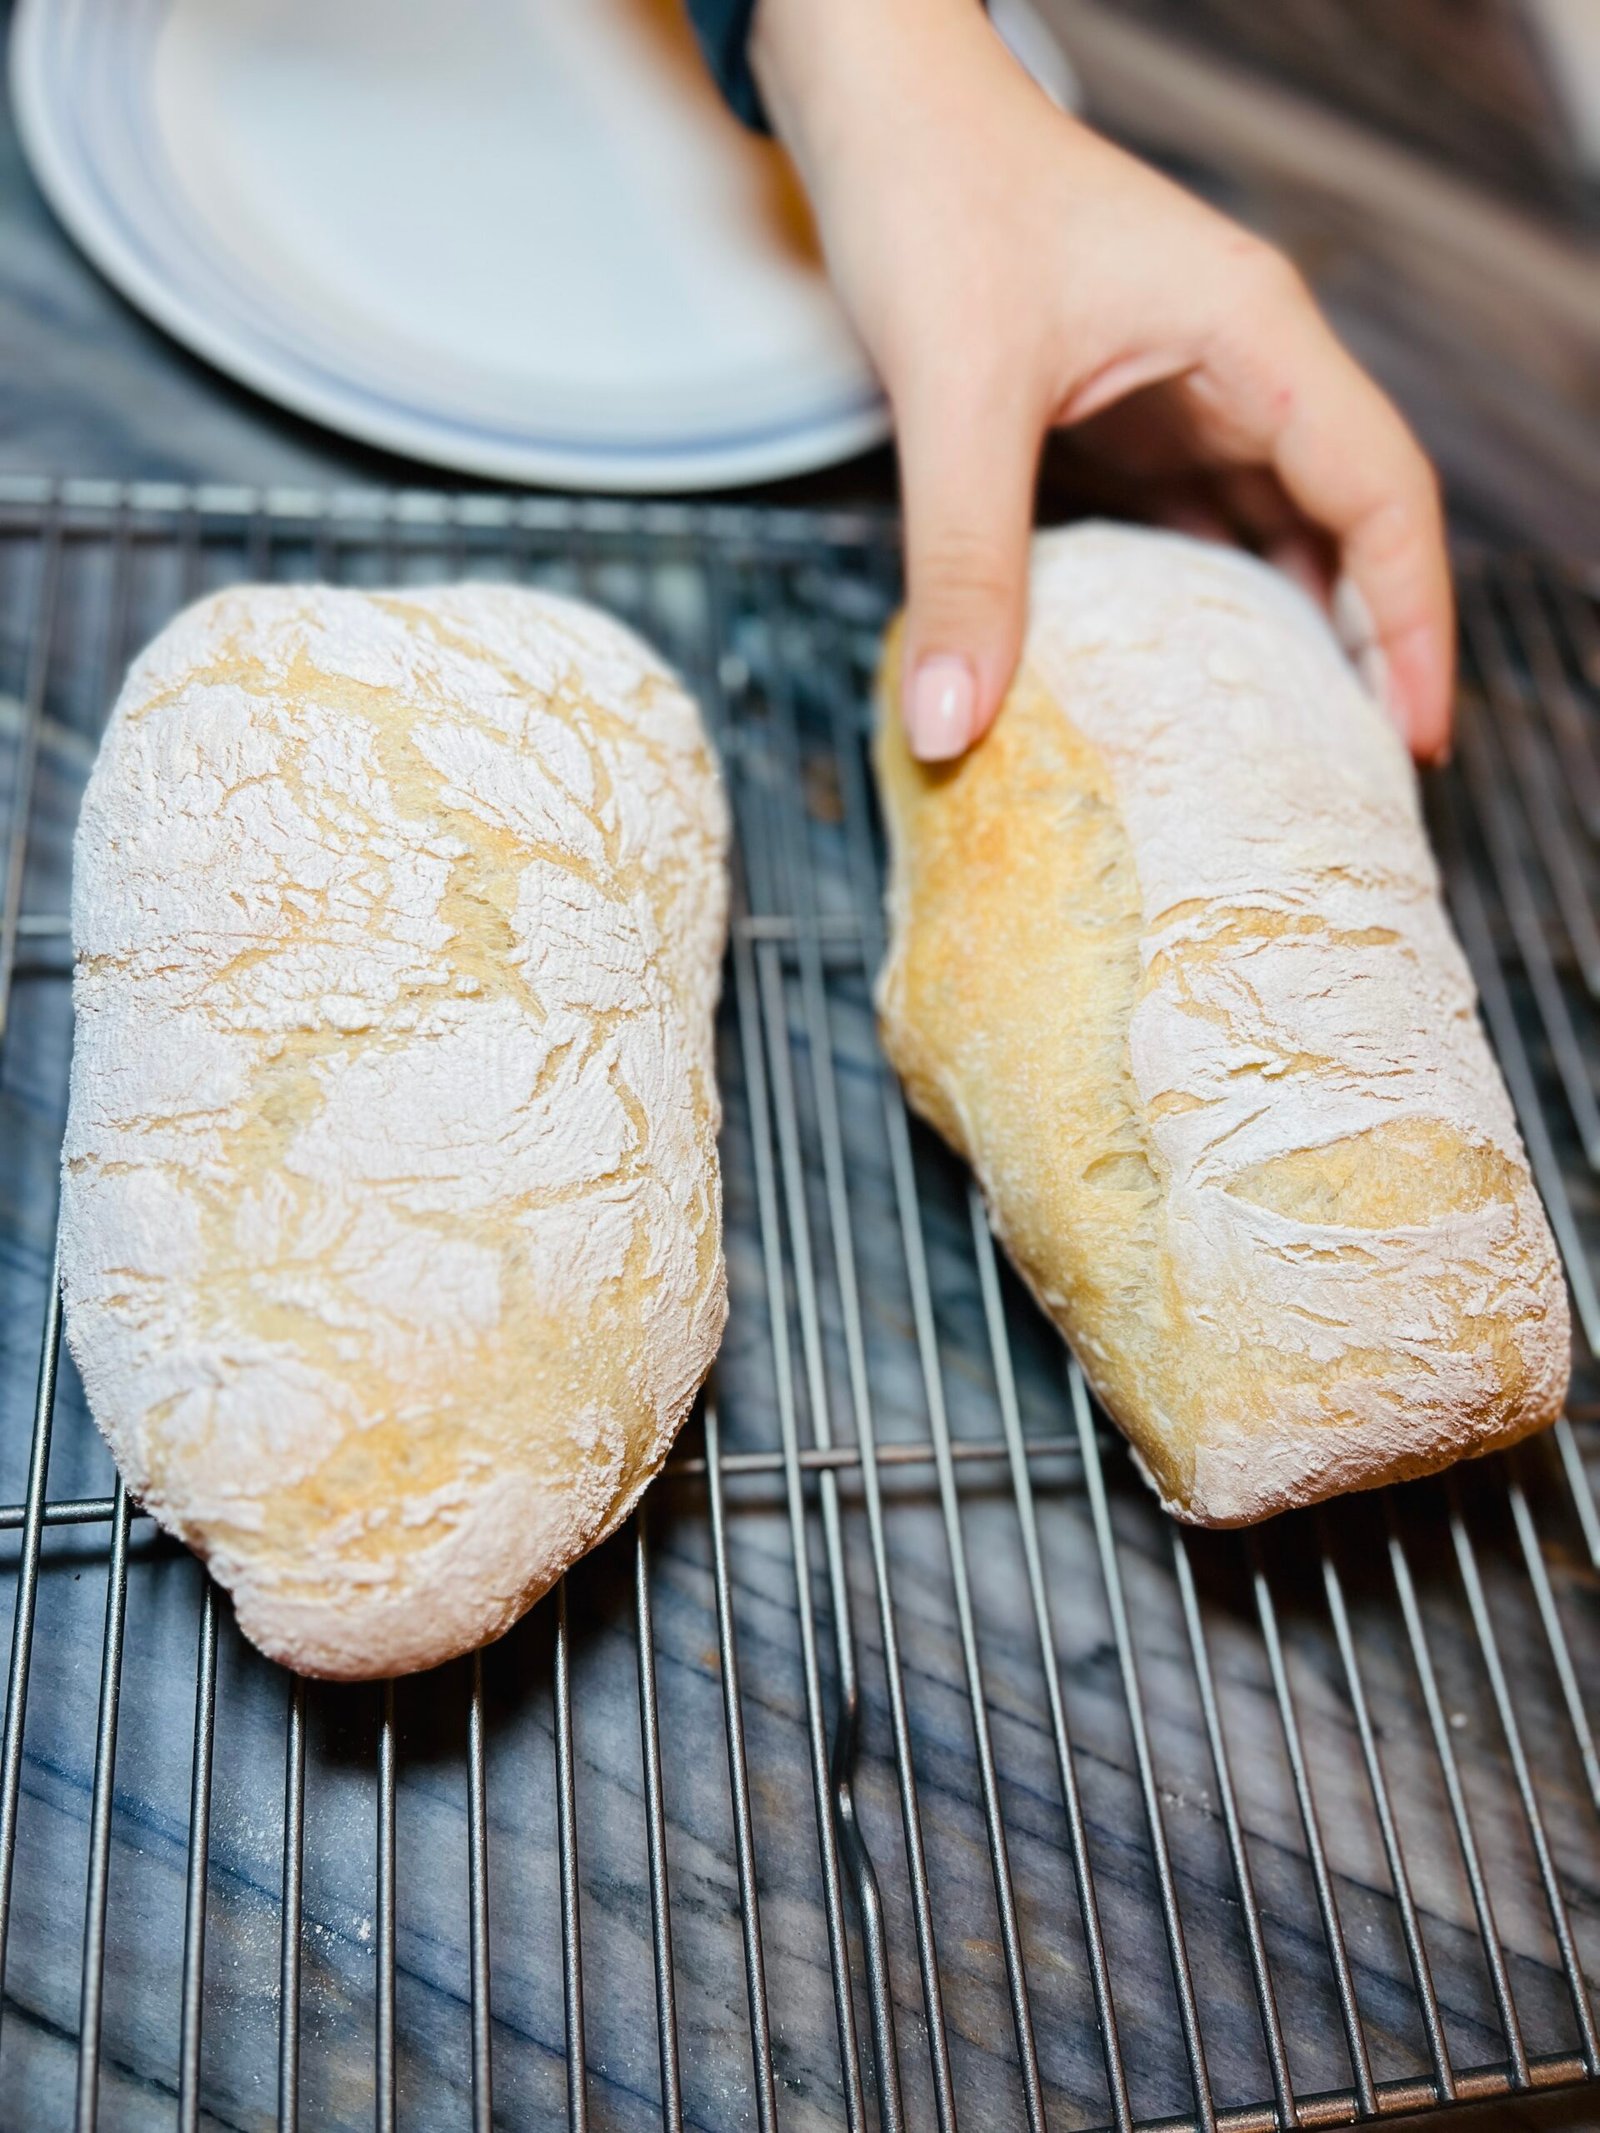
A good ciabatta has big, beautiful holes like a sponge! These holes make the bread light and airy, even though it looks like there’s barely any bread there. This special crumb is what makes ciabatta unique and delicious. Imagine biting into a soft, fluffy cloud – that’s the true beauty of a good ciabatta.
Think crispy, crackly, like tree bark with floury patches – no tears or “ears” allowed! Mahogany is the ideal color, not pale or smooth. Steer clear of loaves that don’t have this distinct look – they might not be the real deal!
Real ciabatta looks wild, not boring! The crust should be rough and crackly, like tree bark with floury bits, in a rich mahogany color. Forget smooth or pale crusts – those are imposters! And the shape? Think flat and rectangular, like a slipper (hence the name!), perfect for slicing open for sandwiches. Don’t worry about fitting your foot in, though! So ditch the tall, smooth loaves and embrace the rustic beauty of authentic ciabatta.
Real ciabatta uses a fancy dough starter called biga, but this recipe skips that step for an easier approach. We just let the dough chill overnight instead! Some might say it’s not “authentic,” but honestly, the original biga choice wasn’t just about taste. It was about competing with French baguettes, which used a different starter.
As a home chef, I care most about flavor and texture, and I think this simpler method makes even better ciabatta. Plus, it’s less work and fewer dishes to clean! Who wants extra bowls to scrub, right? So ditch the biga and embrace the delicious, easy way to ciabatta perfection!
What kind of flour should I use for ciabatta?
Ciabatta Flour: Finding Your Perfect Fit
My go-to flour for ciabatta is “Giusto’s Vita-Grain High Protein Unbleached Bread Flour ” because it’s high in gluten and absorbs water well, both crucial for long ferments. But don’t sweat it if you can’t find it!
Here’s what matters:
- Strong flour is key: Aim for bread flour with around 13% protein content for optimal results. (Good substitute for longer ferments)
- All-purpose works in a pinch: Just know the texture and rise might not be quite the same.


Now, the story behind the flour:
Unlike many historic Italian breads, ciabatta is a newcomer , invented in the 1980s. This means there’s no single “true” flour for it, unlike older breads with established traditions. So, don’t feel boxed in by one specific type! Experiment and find what works best for you.
Remember, baking is about creativity and having fun. Choose a flour that fits your preferences and enjoy the delicious journey of making ciabatta your own!
What Makes Ciabatta Unique?
Ciabatta’s charm lies in its distinct airiness and texture, setting it apart from other breads. Here’s the breakdown:
Airy Delight:
- Big Bubbles: High hydration and dough handling create massive air pockets, resulting in a light and open crumb.
- Floured Up: To prevent sticking during proofing, the wet dough gets generously dusted, contributing to its signature rough, crispy crust, resembling tree bark.
Stay tuned for the next part of the post, where we’ll dive into the ingredients, instructions, and some helpful tips and tricks to make your ciabatta baking experience a success.
Ingredient Spotlight:
- Keep it Simple: Forget fancy additions! Classic ciabatta uses only four ingredients:
- High-gluten flour
- Water
- Salt (Celtic Sea Salt)
- Yeast (Active Dry Yeast)
- No olive oil, no milk, just pure bread goodness.
Texture Talk:
- Soft & Crispy: Indulge in a soft, pillowy interior balanced by a crunchy, delightful crust.
- Fresh is Best: Enjoy the perfect crumb the day it’s baked. For older loaves, revive them with a quick warm-up in the oven.
Visual Guide to Making Ciabatta Bread
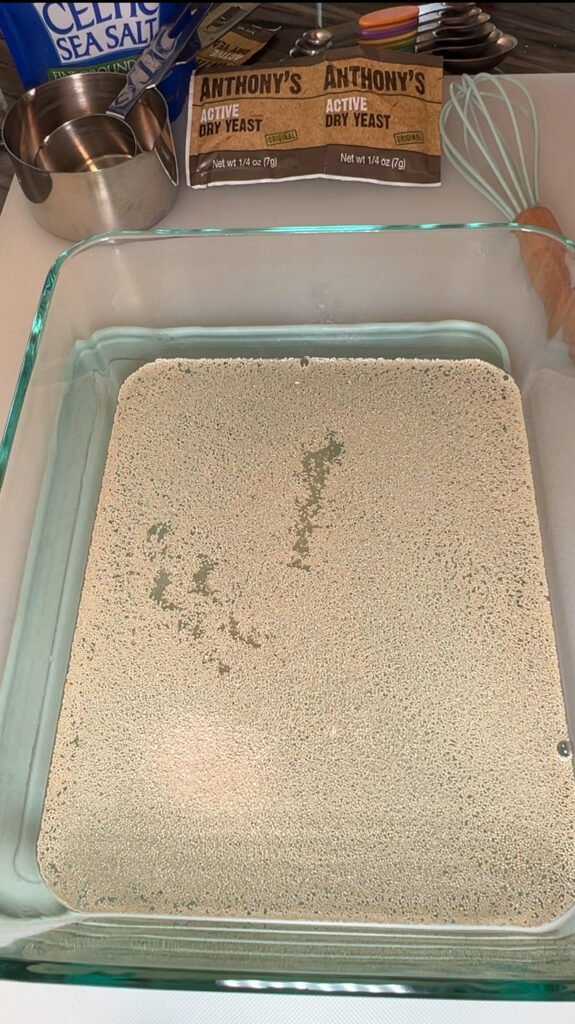
In a large rectangular Pyrex glass food storage container, combine the lukewarm water, salt, and yeast. Stir until the yeast dissolves.

Add the flour and mix with spatula or spoon until a shaggy dough forms. Don’t worry about kneading – a few rough patches are okay!
Cover the container and let the dough rest for 30 minutes. This allows the flour to absorb moisture and begin developing gluten.


After the rest period, wet your hands slightly. Gently stretch one side of the dough upwards and fold it over to the opposite side of the container. Repeat this stretching and folding motion four times in total, turning the container a quarter turn after each fold. Cover the dough again and let it rest for 30 minutes.
After the final set of stretches and folds, cover the Pyrex container tightly and refrigerate overnight. The cold temperature allows the dough to slowly ferment, enhancing flavor and texture.


Preheat your oven to 450°F (230°C) with a pizza stone inside. This allows the stone to get nice and hot for a crispy crust.
While the oven preheats, generously flour your work surface. A fine mesh strainer helps ensure there are no gaps in the flour for a smooth transfer.


Invert the Pyrex container that held your dough rise onto the floured surface. Be patient and gently coax the dough out.


Gently stretch the dough from two opposing sides. Fold one side over the other, creating a rough rectangle.


Divide the dough into 4 equal portions. Shape each piece into a rectangle, gently stretching and coaxing it into shape without overworking the dough.
Place 2 shaped ciabatta loaves on separate pieces of parchment paper on a wire rack. Brush off any excess flour from the tops. Let the loaves proof for a final 10 minutes. This allows them to rise slightly before baking.


Carefully slide the parchment paper (with the ciabatta) onto the hot pizza stone. You can do this two loaves at a time. Bake for 18-20 minutes, or until the loaves are golden brown. To create a steamy environment for a good rise, toss a handful of ice cubes into the bottom of the oven when you first put the loaves in. Repeat the steps for the remaining loaves.


Once baked, carefully transfer the ciabatta to a wire rack to cool completely. You can use a pizza peel for easier removal from the hot stone, or carefully slide the parchment paper onto the rack.
I couldn’t resist Taking a warm bite while the ciabatta was still warm! I crumbled some creamy feta cheese inside, along with juicy heirloom tomato slices and a touch of peppery mustard greens for a delightful bite. The combination of textures and flavors was irresistible! But don’t be afraid to get creative with your fillings. This bread is a blank canvas – go for your favorite cheese and tomato pairing, add some cool cucumber slices for a refreshing twist, or spread on some homemade hummus or mashed avocado for a healthy twist. The possibilities are truly endless!


Forget Kneading! This Ciabatta Recipe is Easier Than You Think (and Perfect for Every Occasion)
So, whether you’re a seasoned baker or a complete beginner, this ciabatta recipe is for you. It’s perfect for:
- Weeknight dinners: Whip up a quick batch and enjoy fresh bread with your favorite meal.
- Weekend baking projects: Get the family involved in a fun and rewarding activity.
- Impressing your guests: Serve homemade ciabatta with dips, bruschetta, or alongside pasta for a touch of rustic elegance.
- Enjoying yourself: Because sometimes, you just deserve a warm, crusty loaf of deliciousness.
So, ditch the complicated recipes and embrace the true essence of ciabatta: simple ingredients, masterful technique, and an unforgettable texture experience. Happy baking!
Ciabatta: Beyond the Sandwich
Ciabatta isn’t just a sandwich champ, it’s a culinary chameleon! Here are 5 ways to unleash its potential:
1. Sandwich Nirvana: Split it open and embrace the classics like prosciutto and mozzarella, or get adventurous with roasted veggies and hummus. It’s your flavor playground!
2. Panini Press Perfection: Heat things up with grilled panini. Layer fillings like salami, brie, and peppers, then press to golden, melty perfection.
3. Olive Oil Heaven: Warm slices dipped in quality olive oil and flaky salt become an addictive appetizer. Take it up a notch with a drizzle of balsamic vinegar.
4. Garlicky Goodness: Brush slices with olive oil, garlic, and herbs for rustic garlic bread that elevates any soup or pasta dish.
5. Crouton Magic: Don’t toss stale ciabatta! Cube it, season it (think herbs, Parmesan, garlic), and bake/fry for delightful croutons that add crunch to salads, soups, and stuffings.
So, grab your ciabatta and get creative! From sandwiches to savory dips, its versatility knows no bounds. Happy feasting!


Equipments:
- Large pizza stone (or baking tray)
- Pyrex Glass Food Storage Container
- Pizza Peel – 12 x 14 inch
- Fine mesh strainer
- Bench scraper
- Ice cubes
- Clean LINEN kitchen towels (2)
- Parchment paper (2 pieces)

How to Make Easiest No- knead Ciabatta Bread
Equipment
Ingredients
- 1⅔ cups 400g lukewarm water (80°F-100°F)
- 1½ tsp 9g salt
- 2 tsp 7g dry yeast
- 3¼ cups 450g strong flour (around 13% protein)
Instructions
Step 1: Prepare the dough
- In a large rectangular Pyrex glass food storage container, combine the lukewarm water, salt, and yeast. Stir until the yeast dissolves.
- Add the flour and mix with a fork or spoon until a shaggy dough forms. Don't worry about kneading – a few rough patches are okay!
- Cover the container and let the dough rest for 30 minutes. This allows the flour to absorb moisture and begin developing gluten.
Step 2: Stretch and fold
- (See video for detailed technique)After the rest period, wet your hands slightly. Gently stretch one side of the dough upwards and fold it over to the opposite side of the container. Repeat this stretching and folding motion four times in total, turning the container a quarter turn after each fold.
- Cover the dough again and let it rest for 30 minutes.
Step 3: Overnight Chill & Easy Shaping
- After the final set of stretches and folds, cover the Pyrex container tightly and refrigerate overnight. The cold temperature allows the dough to slowly ferment, enhancing flavor and texture.
Step 4: Shaping for Bakery-Style Loaves
- Preheat your oven to 450°F (230°C) with a pizza stone inside. This allows the stone to get nice and hot for a crispy crust.
- While the oven preheats, generously flour your work surface. A fine mesh strainer helps ensure there are no gaps in the flour for a smooth transfer.
- Here's a trick! Instead of turning out the sticky dough, invert the Pyrex container that held your dough rise onto the floured surface. Be patient and gently coax the dough out.
- Gently stretch the dough from two opposing sides. Fold one side over the other, creating a rough rectangle.
- Divide the dough into 4 equal portions. Shape each piece into a rectangle, gently stretching and coaxing it into shape without overworking the dough.
- Place 2 shaped ciabatta loaves on separate pieces of parchment paper on a wire rack. Brush off any excess flour from the tops.
- Let the loaves proof for a final 10 minutes. This allows them to rise slightly before baking.
Step 5: Baking for a Golden Crust
- Carefully slide the parchment paper (with the ciabatta) onto the hot pizza stone. You can do this two loaves at a time.
- Bake for 18-20 minutes, or until the loaves are golden brown. To create a steamy environment for a good rise, toss a handful of ice cubes into the bottom of the oven when you first put the loaves in.
- Repeat steps 1 and 2 to bake the remaining loaves.
- Once baked, carefully transfer the ciabatta to a wire rack to cool completely. You can use a pizza peel for easier removal from the hot stone, or carefully slide the parchment paper onto the rack.
Bonus Tip:
- I couldn't resist Taking a warm bite while the ciabatta was still warm! I crumbled some creamy feta cheese inside, along with juicy heirloom tomato slices and a touch of peppery mustard greens for a delightful bite. The combination of textures and flavors was irresistible! But don't be afraid to get creative with your fillings. This bread is a blank canvas – go for your favorite cheese and tomato pairing, add some cool cucumber slices for a refreshing twist, or spread on some homemade hummus or mashed avocado for a healthy twist. The possibilities are truly endless!Enjoy your homemade ciabatta – the delicious reward for your minimal effort!
Video
Notes
Here are some tips and tricks to elevate your ciabatta baking experience:
For a Dreamy Crust:- Preheat properly: Preheat your oven and pizza stone (if using) well in advance for even heat distribution and a crispier crust.
- Steam power: Throwing ice cubes in the oven when baking creates steam, mimicking a professional bakery environment and enhancing crust development.
- Scoring magic: Score the dough surface before baking with a sharp knife or razor blade. This allows the dough to expand beautifully and creates those signature cracks.
- Mist it up: Spraying the dough lightly with water before baking adds extra moisture and contributes to a crustier exterior.
- Flour power: Don’t underestimate the importance of using high-quality bread flour. Its higher protein content helps develop gluten, leading to a more airy and structured crumb.
- Hydration balance: Water is key! Ensure your dough is neither too wet nor too dry for optimal gluten development and an airy crumb.
- Gentle handling: Avoid overworking the dough during shaping. Handle it gently to preserve the air bubbles and achieve a light, fluffy crumb.
- Proofing patience: Be patient with the proofing times. Under-proofing will result in a dense loaf, while over-proofing can lead to a collapsed crumb.
- Use a bench scraper: This handy tool makes shaping and transferring the dough a breeze, minimizing mess and ensuring even shaping.
- Dusting matters: Generously dust your work surface with flour to prevent sticking and ensure smooth shaping.
- Leftover love: Don’t discard leftover ciabatta! Cube it and toast it for delicious croutons, breadcrumbs, or use it for panzanella salad.
- Experiment with flavors: Once you master the basic recipe, get creative! Add herbs, olives, sun-dried tomatoes, or other ingredients to customize your ciabatta.
Disclosure: This post may contain affiliate links to products (including Amazon). I’ll earn a small commission if you make a purchase through my link, at no additional cost to you! Regardless, I only link to products that I personally use on our homestead or believe in.
